Showing posts with label LINUX. Show all posts

Monday, October 24, 2016

Chatting Program Using Linux System Programming

user1.c


/* Our first program is to be run in one terminal. After the headers the shared memory segment
 (the size of our shared memory structure) is created with a call to shmget,
 with the IPC_CREAT bit specified. */

#include <unistd.h>
#include <stdlib.h>
#include <stdio.h>
#include <string.h>

#include <sys/shm.h>

#include "shm_com.h"

int main()
{
    int running = 1;
    void *shared_memory = (void *)0;
    struct shared_use_st *shared_stuff;
    int shmid;
    char buffer[BUFSIZ];

    srand((unsigned int)getpid());    

    shmid = shmget((key_t)1234, sizeof(struct shared_use_st), 0666 | IPC_CREAT);

    if (shmid == -1)
      {
        fprintf(stderr, "shmget failed\n");
        exit(EXIT_FAILURE);
     }

/* We now make the shared memory accessible to the program. */

    shared_memory = shmat(shmid, (void *)0, 0);
    if (shared_memory == (void *)-1)
      {
        fprintf(stderr, "shmat failed\n");
        exit(EXIT_FAILURE);
      }

    printf("Memory attached at %X\n", (int)shared_memory);

/* The next portion of the program assigns the shared_memory segment to shared_stuff,
 which then prints out any text in written_by_user2. The loop continues until end is found
 in written_by_user1. The call to sleep forces the consumer to sit in its critical section,
 which makes the producer wait. */

    shared_stuff = (struct shared_use_st *)shared_memory;
    shared_stuff->written_by_user2 = 0;
    while(running)
     {

       if (!(shared_stuff->written_by_user2))
        {  
        printf("Enter some text: ");
        fgets(buffer, BUFSIZ, stdin);
        
        strncpy(shared_stuff->user_1, buffer, TEXT_SZ);
        shared_stuff->written_by_user1 = 1;
        }

        if (shared_stuff->written_by_user2)
       {
            printf("user2 wrote: %s", shared_stuff->user_2);
            sleep( rand() % 4 ); /* make the other process wait for us ! */
            shared_stuff->written_by_user2 = 0;
            if (strncmp(shared_stuff->user_1, "end", 3) == 0)
            {
                running = 0;
            }


        }


        if (strncmp(buffer, "end", 3) == 0)
       {
                running = 0;
        }

    }
 
/* Lastly, the shared memory is detached and then deleted. */

    if (shmdt(shared_memory) == -1)
   {
        fprintf(stderr, "shmdt failed\n");
        exit(EXIT_FAILURE);
    }

    if (shmctl(shmid, IPC_RMID, 0) == -1)
      {
        fprintf(stderr, "shmctl(IPC_RMID) failed\n");
        exit(EXIT_FAILURE);
      }

    exit(EXIT_SUCCESS);
}


user2.c 

/* The second program is the producer and allows us to enter data for consumers.
 It's very similar to shm1.c and looks like this. */

#include <unistd.h>
#include <stdlib.h>
#include <stdio.h>
#include <string.h>

#include <sys/shm.h>

#include "shm_com.h"

int main()
{
    int running = 1;
    void *shared_memory = (void *)0;
    struct shared_use_st *shared_stuff;
    char buffer[BUFSIZ];
    int shmid;

    shmid = shmget((key_t)1234, sizeof(struct shared_use_st), 0666 | IPC_CREAT);

    if (shmid == -1)
      {
        fprintf(stderr, "shmget failed\n");
        exit(EXIT_FAILURE);
       }

    shared_memory = shmat(shmid, (void *)0, 0);
    if (shared_memory == (void *)-1)
      {
        fprintf(stderr, "shmat failed\n");
        exit(EXIT_FAILURE);
      }

    printf("Memory attached at %X\n", (int)shared_memory);

    shared_stuff = (struct shared_use_st *)shared_memory;
    shared_stuff->written_by_user1 = 0;

    while(running) {
    if (!(shared_stuff->written_by_user1))
      {
        printf("Enter some text: ");
        fgets(buffer, BUFSIZ, stdin);
        
        strncpy(shared_stuff->user_2, buffer, TEXT_SZ);
        shared_stuff->written_by_user2 = 1;
       }


       if (shared_stuff->written_by_user1)
       {
            printf("user1 wrote: %s", shared_stuff->user_1);
            sleep( rand() % 4 ); /* make the other process wait for us ! */
            shared_stuff->written_by_user1 = 0;
            if (strncmp(shared_stuff->user_2, "end", 3) == 0)
            {
                running = 0;
            }

         }
                if (strncmp(buffer, "end", 3) == 0)
               {
                running = 0;
               }
    }

        if (shmdt(shared_memory) == -1)
           {
        fprintf(stderr, "shmdt failed\n");
        exit(EXIT_FAILURE);
           }
    exit(EXIT_SUCCESS);
}


 shm_com.h


/* A common header file to describe the shared memory we wish to pass about. */

#define TEXT_SZ 208

struct shared_use_st {
    int written_by_user1;
    int written_by_user2; 
    char user_1[TEXT_SZ];
    char user_2[TEXT_SZ];
};


Wednesday, December 10, 2014

poll()

poll() is a userspace function which provides application to monitor I/O events on a set of file descriptors.


#include <poll.h>

int poll(struct pollfd
 fds[], nfds_t nfds, int timeout);// polls over an array of structures


The <poll.h> header shall define the pollfd structure, which shall include at least the following members:
int    fd       The following descriptor being polled. 
short  events   The input event flags 
short  revents  The output event flags  


nfds means the number of file descriptors on which polling is being done.
Timeout means the poll function will wait for this many milliseconds for the vent to occur.
If the value of timeout is 0 then the function return immediately.
if the vale of timeout is -1 then poll shall bloack untill a requested event has occured or untill the call is interrupted.

The poll function supports for regular files, terminal and pseudo-terminal devices, FIFOs, pipes, sockets and  STREAMS-based files.


The flags used for events and revents are-


POLLIN
Data other than high-priority data may be read without blocking.
POLLRDNORM
Normal data may be read without blocking.
POLLRDBAND
Priority data may be read without blocking.
POLLPRI
High priority data may be read without blocking.
POLLOUT
Normal data may be written without blocking.
POLLWRNORM
Equivalent to POLLOUT.
POLLWRBAND
Priority data may be written.
POLLERR
An error has occurred (revents only).
POLLHUP
Device has been disconnected (revents only).
POLLNVAL
Invalid fd member (revents only).


Return value of poll function


On successful return the poll functions returns a positive integer value which means the number of fds selected.0 means no fd seslected and the call timed out.
Upon failure, poll() shall return -1 and set errno to indicate the error.


ERRORS REPORTED:

[EAGAIN]
The allocation of internal data structures failed but a subsequent request may succeed.
[EINTR]
A signal was caught during poll().
[EINVAL]
The nfds argument is greater than {OPEN_MAX},or one of the fd members refers to a STREAM or multiplexer that is linked (directly or indirectly) downstream from a multiplexer. 


EXAMPLE

Checking for Events on a Stream
The following example opens a pair of STREAMS devices and then waits for either one to become writable. This example proceeds as follows:
  1. Sets the timeout parameter to 500 milliseconds.
  2. Opens the STREAMS devices /dev/dev0 and /dev/dev1, and then polls them, specifying POLLOUT and POLLWRBAND as the events of interest.
    The STREAMS device names /dev/dev0 and /dev/dev1 are only examples of how STREAMS devices can be named; 
  3. Uses the ret variable to determine whether an event has occurred on either of the two STREAMS. The poll() function is given 500 milliseconds to wait for an event to occur (if it has not occurred prior to the poll() call).
  4. Checks the returned value of ret. If a positive value is returned, one of the following can be done:
    1. Priority data can be written to the open STREAM on priority bands greater than 0, because the POLLWRBAND event occurred on the open STREAM ( fds[0] or fds[1]).
    2. Data can be written to the open STREAM on priority-band 0, because the POLLOUT event occurred on the open STREAM ( fds[0] or fds[1]).
  5. If the returned value is not a positive value, permission to write data to the open STREAM (on any priority band) is denied.
  6. If the POLLHUP event occurs on the open STREAM ( fds[0] or fds[1]), the device on the open STREAM has disconnected.
#include <stropts.h>
#include <poll.h>
...
struct pollfd fds[2];
int timeout_msecs = 500;
int ret;
    int i;


/* Open STREAMS device. */
fds[0].fd = open("/dev/dev0", ...);
fds[1].fd = open("/dev/dev1", ...);
fds[0].events = POLLOUT | POLLWRBAND;
fds[1].events = POLLOUT | POLLWRBAND;


ret = poll(fds, 2, timeout_msecs);


if (ret > 0) {
    /* An event on one of the fds has occurred. */
    for (i=0; i<2; i++) {
        if (fds[i].revents & POLLWRBAND) {
        /* Priority data may be written on device number i. */
...
        }
        if (fds[i].revents & POLLOUT) {
        /* Data may be written on device number i. */
...
        }
        if (fds[i].revents & POLLHUP) {
        /* A hangup has occurred on device number i. */
...
        }
    }
}


There is one important variant of poll function known as poll_wait


The system uses a poll_wait call to indicate that the poll system is interested in events. The poll_wait call includes a reference to a wait queue that must be triggered by a driver event. Another argument to poll_wait function is a poll_table structure.


 What exactly happens is that on calling poll_wait() the kernel calls all the fops->poll on all associated fds, passing the the global poll table.
 poll_wait() adds the process' wait_queue(events its is waiting for) to this global poll table. Or simply,a process adds itself to all the wait queues it is dependent on, and on
poll/poll_wait invocation the kernel checks the global poll table if the
event has occured. If the event is not ready (blocked on I/O, device not
ready etc), it puts the process to sleep. Once an event has occurred (say
read on FD), it is removed from all wait queues and all the wake handlers
associated with the queue are called waking up the process. So from the
outside it'll look like the poll_wait() block until an event has occured,
but actually the event triggers the wakeup of the process. 


Saturday, November 8, 2014

Explain the usage of ctags.

  • It is a programming tool that generates index file of names found is source and header file. 
  • It is used in many programming languages.
  • Functions, variables, class names, structures, macros are indexed, but what all names can be indexed depends on the programming language.
  • Most commonly used ctags with vim editor is Exuberant Ctags.


Useful Commands

  • To enable ctags in a source file give the command ctags -R *
  • It parses all the names and creates a stack for each name.
  • To view the definition of a function or a structure we need to take our cursor over it and enter ctrl+] command.
  • To come back to fucntion call from definition we use ctrl+t.
  • Following vim commands can be used to navigate through relevant functions
  • :ts or :tselect shows the list
  • :tn or :tnext goes to the next tag in that list
  • :tp or :tprev goes to the previous tag in that list
  • :tf or :tfirst goes to the first tag of the list
  • :tl or :tlast goes to the last tag of the list

Sunday, November 2, 2014

GDB

  • GDB or GNU debugger is a standard debugger for GNU based OS like Linux.

                             How to start gdb?

  •  We compile our program like this 
cc -g -o program program.c
gdb program

The g option helps us to know where the program is failing.

  • Now we enter gdb program
  • How our gdb program is running over our program named "program".
  • To run a program now with gdb debugger we enter the command run.
  • Whenever the program faults the gdb gives the location and reason for failure.


             Stacktrace and Examining Variables

  • To back trace the call flow of program to get to know from where the problem would have originated in program execution we enter backtrace command while running gdb.
  • We can also know the values of variables in current state when the program had faulted by using print command, eg. print i; this will give us the value of variable i when the program had faulted.
  • gdb keeps these results in a pseudo variable starting with $1, $2 and so.
  • To print a number of consecutive items we use print array[0]@n  , where n is the number of items that we want to print and array is the array name.


    Listing the program and Setting Breakpoints

  • When we are within gdb and want to view the source code of the program then we use list command, this will print the few lines before and few lines after the program faulted while running.
  • To display more lines we use list command again.
  • To set a breakpoint at a particular line we enter these set of commands
gdb program
break lineno
run

  • The program stops where we have set the breakpoint and prints the value of variable at that point belonging to that line.
  • To continue the program we use cont command.
  • We can use display command to set gdb to display the values of variables whenever the program stops at a breakpoint eg. display k; display array[0]@4.
  • To come out of gdb anytime we use quit command.
  • We can see the breakpoints and displays we have enabled using these commands
info break

info display

  • To disable breakpoint and display we use
 disable break #  (# is the breakpoint number we see using info break command).

disable display # (# is the display we have set using info display command).


Thursday, October 30, 2014

SPI Protocol

SPI(Serial Peripheral Interface) is a single master multiple slave serial transmission protocol that works in full duplex mode.


  • There can be only one master but there can be multiple slaves.
  • MOSI- Master out Slave In
  • MISO- Master In Slave Out
  • SCLK- Clock Signal
  • SS or CS- Slave Select or Chip Selecthe 
  • The data is transmitted using shift register.
  • With the number of clocks equal to the word size(generally 8) the master and slave would have exchanged the value in their shift register.
  • They can now process the data they have received or/and can load new data in the shift register.


Lets Talk Business and Discuss The actual Protocol

  • To start off , the the master configures the clock rate of transmission(frequency should be less than the maximum supportable frequency).
  • The master then sends a chip select signal 0 on the chip select line which it wants to choose.
  • Since the lines are active high so by default they are high(initially).
  • Sometimes a waiting time is involved, so the master must wait for that duration before it starts the clock cycle.
  • During each SPI clock cycle a full transmission happens with this operation-
  1. The master sends one bit on MOSI line and the slave reads on the same line.
  2. The slave sends one bit on the MISO line and the master reads on the same line.
  • We may not need all these transmission for our purpose but as per the protocol this has to happen.

I2C Protocol

I²C (Inter-Integrated Circuit) is a multi-master, multi-slave, single-ended(data flow in only one direction at a time), serial computer bus invented by Philips Semiconductor, known today as NXP Semiconductors, used for attaching low-speed peripherals to computer's motherboards and embedded systems.


The Physical I2C Bus


  • Physically I2C consits of just 2 buses.
  • One bus is SDA for data transfer and the other one is SCL for the clock.
  • All the devices on the I2C bus are connected on these two lines.


  • Both these lines are open drain lines, i.e the chip can drive these lines low but can't drive it high.
  • To make it high we need to connect a pull up register to both the lines connected to 5V supply.
  • We don't need separate pull up register for each device.


Masters and Slaves

  • The devices on I2C bus are either master or slave.
  • Characteristics of a master-

  1. Master is the one who drives the clock.
  2. Master is the one who initiates the transfer.
  3. Though both master and slave send data over the bus bus but the transferred is controlled by master.

I2C Device Addressing

  • I2C device addresses are either 7 bit or 10 bit.
  • Considering 7 bit addressing we can connect upto 128 devices to the I2C bus.


  • While sending we send the address as a 8 bit sequence with 8th bit telling the slave if master is reading(1) or writing(0) from /to the device.


The I2C Protocol

  • SDA is allowed to change only when SCL is low , but it is not followed in 2 cases.
1. Start Sequence

2. Stop Sequence


  • The start and stop sequence is sent by master and it marks the beginning and end of the transfer with the slave device.
  • Steps for writing to the slave-
1. Send a start sequence(all the I2C devices start to listen)
2. Send the I2C address of the slave with the R/W bit low (even address/writing)(all the slaves listen to it and matches it with their own address).
The slave sends the acknowledgement bit in return if the address matches.
3. Send the internal register number you want to write to
4. Send the data byte
5. [Optionally, send any further data bytes]
6. Send the stop sequence.

  • Steps for reading from the slave-
1. Send a start sequence( all the I2C devices on the bus start to listen)
2. Send I2C address of the slave with the R/W bit low (even address/write)(all the slaves listen to it and matches it with their own address).
The slave sends the acknowledgement bit in return if the address matches.
3. Send Internal address of the register to which we need to write.
4. Send a start sequence again (repeated start)
5. Send I2C address of the slave with the R/W bit high (odd address)(slave knows it has to be read from)
6. Read data byte from slave
7. Send the stop sequence.

The peculiar thing in this operation is that even in read operation we do one write operation to know the register from which we need to read from.

Tuesday, October 14, 2014

What are the important applications of touch command in linux?

If we write touch filename then only the time at which the file has been accessed gets changed in the linux records.This command doesn't open the file.

What other things can we do using touch command?

1. Creating an empty file

touch a.txt

2. Creating multiple empty files

touch a.txt b.txt c.txt

3. touch -a random.txt

touches the file random.txt and if the file is not present creates a new file with the name.

4. touch -c random.txt

touches the file random.txt and if the file is not present it doesn't create a new file.

5. touch -r random.txt alpha.txt

updates the timestamp of file alpha with the timestamp of file random.txt

6. touch -t 201410152030.40 random.txt

this command will give random.txt file a timestamp of 15th october 2014 and 8 30 PM and 40 seconds.

What is the difference between a Mutex and a Semaphore?

Strictly speaking, mutex is a locking mechanism whereas semaphore is a signaling mechanism.
Mutex is the lock to a toilet and semaphore is the number of identical keys to a shared resource.
Imagine a buffer being split up into 4 parts and then the semaphore count can become 4, i.e there are now 4 instance to the same resource. Mind it , it is not the same resource. A semaphore with a value of 0 is similar to mutex but is has a difference, in mutex ,the thread within the same process can unlock the mutex whereas in semaphore an external thread can also free the semaphore by giving wakeup signal.

Wednesday, July 23, 2014

What is a kernel Panic?

It is an action taken by linux kernel when it experiences a situation from where it can't recover safely.In many cases the system may keep on running but due to security risk by fearing security breach the kernel reboots or instructs to be rebooted manually.


It can be caused due to various reasons-
1. Hardware failure
2. Software bus in the OS.
3. During booting the kernel panic can happen due to one of the reasons-
a.Kernel not correctly configured, compiled or installed.
b.Incompatibility of OS, hardware failure including RAM.
c.Missing device driver
d.Kernel unable to locate root file system
e.After booting if init process dies.


In windows operating systems the equivalent term is stop error(or, colloquiaally Blue screen of death).


For any clarifications or if you have any suggestion please post comments below.

What is the difference between IRQ and FIQ in case of ARM?

ARM treats FIQ(Fast interrupt request) at a higher priority as compared to IRQ(interrupt request). When an IRQ is executing an FIQ can interrupt it while vice versa is not true.

ARM uses a dedicated banked out register for FIQ mode ; register numbers R8-R12.
http://learnlinuxconcepts.blogspot.in/2014/06/arm-architecture.html
So when an FIQ comes these registers are directly swapped with the normal working register and the CPU need not take the pain of storing these registers in the stack. So it makes it faster.

One more point worth noting is that  the FIQ is located at the end of exception vector table(0X1c) which means that the code can run directly from 0X1C and this saves few cycles on entry to the ISR.


For any clarifications or if you have any suggestion please post comments below.

When should one use Polling and when should one use Interrupts?

Both the mechanisms have their own pluses and minuses.

We should use interrupts when we know that our event of interest is-

1. Asynchronous
2. Important(urgent).
3. Less frequent


We should use polling when we know that our event of interest is-

1. Synchronous
2. Not so important
3. Frequent(our polling routine should encounter events more than not)


For any clarifications or if you have any suggestion please post comments below.

Saturday, February 22, 2014

System Calls

In this post we will discuss mainly about what are system calls, why do we need it and how to implement it.


What is a system call ?

To understand this first we would ask ourselves what are the stuffs the OS(read kernel) needs to do ?

  • Process Management (starting, running, stopping processes)
  • File Management(creating, opening, closing, reading, writing, renaming files)
  • Memory Management (allocating, deallocating memory)
  • Other stuff (timing, scheduling, network management).
So, system call is an interface through which user space applications request the Kernel do perform the operations listed above.

An example would be , the user space requests to open a device(hardware).

In short we can say that the System call is an interface between user space processes and hardware.


Why do we need system call?


  1. It provides an abstraction to the user space process. Eg. open call for user means just open the device, the user doesn't need to care about intricacy of the call.
  2. It maintains the system security and stability  as the kernel first checks the authenticity of the call before requesting it a service.
  3. It helps in virtualization of various processes i.e various processes can use it independently.

System call interface and C library.

The system call interface in Linux, as with most Unix systems, is provided in part by the C library.

We will see How System call works using a example of printf() call in userspace.


Syscalls

  •     System calls (syscalls in Linux) are accessed via function calls. System calls need inputs and also provide a return value (long) signifies success or error.( 0 generally means success).
  •        System calls have a defined behavior. 
For example, the system call getpid() is defined to return an integer that is the current process's PID. 
The implementation of this syscall in the kernel is very simple:
asmlinkage long sys_getpid(void)
{ return current->tgid;
}

  • Some important observations from this-
  1. A convention in which a system call is appended with sys in kernel space.
  2. asmlinkage modifier -tells the compiler that the function should not expect to find any of its arguments in registers (a common optimization), but only on the CPU's stack.
  •      In Linux, each system call is assigned a syscall number. This is a unique number that is used to reference a specific system call.
  •         When the syscall number is assigned, it cannot changed or be recycled.
  •        System calls in Linux are faster than in many other operating systems. (such as fast context switch times.
  •        The kernel keeps track of all the registered system calls in table sys_call_table which is defined in enTRy.S( assembler file) in arch/arch-name/kernel/


System Call Handler:-


  •        Since the system call code lies in kernel side, so to execute it we must switch the processor to kernel mode when system call is executed.
  •        This is done by issuing a software interrupt.
  •        In this mechanism an exception is raised and the Kernel switches to kernel mode and execute the system call handler.
  •        The defined software interrupt on x86 is the int $0x80 instruction in ARM the address is 0x08 offset from start of exception vector base(0X00000000, or 0xFFFF0000)
  •        It triggers a switch to kernel mode and the execution of exception vector 128, which is the system call handler. 
  •        The system call handler  function is system_call(). 
  •        It is architecture dependent and typically implemented in assembly in entry.S
  •        User space first enters the system call number in eax register(X86) and causes the trap.
  •        The kernel reads the value of the eax register and calls the appropriate system call handler.
  •        The system_call() function checks the validity of the given system call number by comparing it to NR_syscalls. 
  •          If it is larger than or equal to NR_syscalls, the function returns -ENOSYS. Otherwise, the specified system call is invoked:
         call *sys_call_table(,%eax,4)
  •            Because each element in the system call table is 32 bits (four bytes), the kernel multiplies the given system call number by four to arrive at its location in the system call table


  •      Now, the system call is called with some parameters, generally upto 5 parameters, we store the parameters values in registers ebx, ecx, edx, esi, and edi.
  •        In some unique cases when 6 or more parameters are passed then a single register is used which stores the pointer to the user space where all the parameters are stored.
  •         Not only this, even the return value is stored in the the register( eax in case of X86).


How to implement system calls?

Adding a system call is an easy task. But it is the implementation that has to be done carefully.

Now we will see what are the steps used to implement a system call.


   First we must define its purpose. What is the use of this system call? The syscall should have exactly one purpose.
Next, we must define system call's arguments, return value, and error codes.
The system call should have a clean and simple interface with the smallest number of arguments possible.

  •         Final Steps in Binding a System Call
  1.         First, add an entry to the end of the system call table.
  2.          For each architecture supported, the syscall number needs to be defined in <asm/unistd.h>.
  3.         The syscall needs to be compiled into the kernel image

How system call verifies parameters(arguments)?
  •      System calls must make sure all of their parameters are valid and legal.  Such as access permission.
  •      System calls must carefully verify all their parameters to ensure that they are valid and legal. 
  •       The system call runs in kernel-space, and if the user is able to pass invalid input into the kernel without restraint, the system's security and stability can suffer, in short the kernel can be hacked!!
  •       For example, for file I/O syscalls, the syscall must check whether the file descriptor is valid. Process-related functions must check whether the provided PID is valid. Every parameter must be checked to ensure it is not just valid and legal, but correct.
  •       One of the most important checks is the validity of any pointers that the user provides. Imagine if a process could pass any pointer into the kernel, unchecked, with warts and all, even passing a pointer for which it did not have read access! Processes could then trick the kernel into copying data for which they did not have access permission, such as data belonging to another process. Before following a pointer into user-space, the system must ensure that

  1.        The pointer points to a region of memory in user-space. Processes must not be able to trick the kernel into reading data in kernel-space on their behalf.
  2.       The pointer points to a region of memory in the process's address space. The process must not be able to trick the kernel into reading someone else's data.
  3.       If reading, the memory is marked readable. If writing, the memory is marked writable. The process must not be able to bypass memory access restrictions

  •       Two methods for performing the requisite checks and the desired copy to and from user-space:
  1.      For writing into user-space, the method copy_to_user(destination memory address , source pointer , size of the data to copy ) is provided.
  2.      For reading from user-space, the method copy_from_user(destination memory address , source pointer, the number from the second parameter reading into the first parameter) is used.
  •     Both of these functions return the number of bytes they failed to copy on error. On success, they return zero. It is standard for the syscall to return -EFAULT in the case of such an error.  
  •         check is for valid permission. A call to capable() with a valid capabilities flag returns nonzero if the caller holds the specified capability and zero otherwise. For example, capable(CAP_SYS_NICE) checks whether the caller has the ability to modify nice values of other processes.


Saturday, February 8, 2014

Android Boot Sequence

In this post we will discuss about the boot process of Android operating system. As the Android is based on Linux Kernel , so its boot process will give good idea about Linux boot process also. Most android based systems run on ARM processors.

First of all we will see the meaning of various terms that is used in the android boot sequence.


  • BootROM- It is a hardwired code resided in CPU ASICS.
  • Bootloader- It is a small program which runs before the Android OS starts running.
  • Init process- It is the first process launched by Linux Kernel when it is finished with the setup.

Let's see what happens when a user presses power ON button--


Complete path the boot process takes when we press the power button on our android phones.


Step 1-System start-- Boot ROM code start execution from pre defined location. It load Bootloader into RAM and start execution.

  • A. The Boot ROM code will detect the boot media using a system register that maps to some physical balls on the ASIC. This is to determine where to find the first stage of the boot loader.
  • B. Once the boot media sequence is established the boot ROM will try to load the first stage boot loader to internal RAM. Once the boot loader is in place the boot ROM code will perform a jump and execution continues in the boot loader.
[Android_boot_1.png]


Step 2 : Bootloader--

  • Bootloader perform execution in two stages, first stage It to detect external RAM and load program which helps in second stage, In second stage bootloader setup network, memory, etc. which requires to run kernel, bootloader is able to provide configuration parameters or inputs to the kernel for specific purpose.  
  • Android bootloader can be found at 
<AndroidSource>\bootable\bootloader\legacy\usbloader
  • Legacy loader contain two important files viz. init.S and main.c 1. init.s - Initializes stacks, zeros the BSS segments, call _main() in main.c
    2. main.c - Initializes hardware (clocks, board, keypad, console), creates Linux tags.
  • In embedded Linux uBoot is often the boot loader of choice. Device manufacturers often use their own proprietary boot loaders.

[Android_boot_2.png]

  • A. The first boot loader stage will detect and set up external RAM.
  • B. Once external RAM is available and the system is ready the to run something more significant the first stage will load the main boot loader and place it in external RAM.
  • C. The second stage of the boot loader is the first major program that will run. This may contain code to set up file systems, additional memory, network support and other things. On a mobile phone it may also be responsible for loading code for the modem CPU and setting up low level memory protections and security options.
  • D. Once the boot loader is done with any special tasks it will look for a Linux kernel to boot. It will load this from the boot media (or some other source depending on system configuration) and place it in the RAM. It will also place some boot parameters in memory for the kernel to read when it starts up.
  • E. Once the boot loader is done it will perform a jump to the Linux kernel, usually some decompression routine, and the kernel assumes system responsibility.


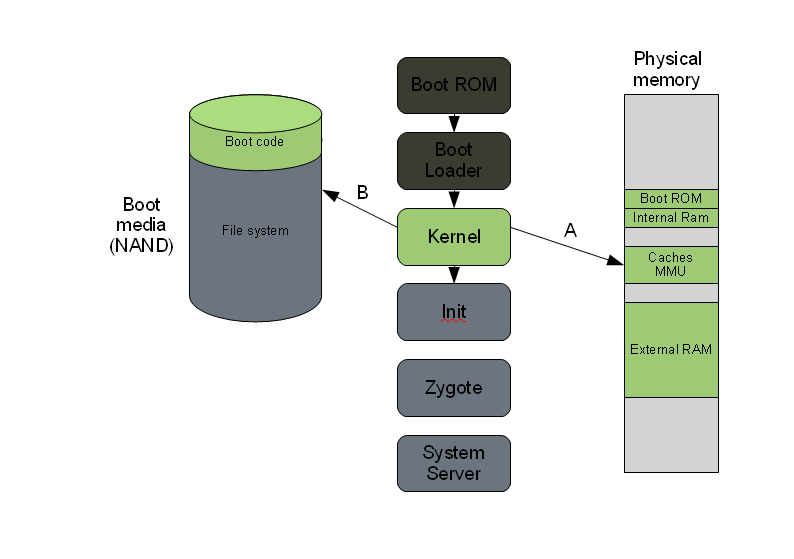
3. The Linux kernel

The Linux kernel starts up in a similar way on Android as on other systems. It will set up everything that is needed for the system to run. Initialize interrupt controllers, set up memory protections, caches and scheduling.

[Android_boot_3.png]


  • A. Once the memory management units and caches have been initialized the system will be able to use virtual memory and launch user space processes.
  • B. The kernel will look in the root file system for the init process (found under system/core/init in the Android open source tree) and launch it as the initial user space process.

4. The init process


[Android_boot_4.png]
init it very first process, we can say it is root process or grandmother of all processes. init process has two responsibilities 1. mount directories like /sys, /dev, /proc and 2. run init.rc script.


  • init process can be found at init : <android source>/system/core/init
  • init.rc file can be found in source tree at <android source>/system/core/rootdir/init.rc
  •  This is a script that describes the system services, file system and other parameters that need to be set up. The init.rc script is placed in system/core/rootdir in the Android open source project.

5. Zygote and Dalvik -


[Android_boot_5.png]

  • In a Java, We know that separate Virtual Machine(VMs) instance will popup in memory for separate per app, In case of Android app should launch as quick as possible, If Android os launch different instance of Dalvik VM for every app then it consume lots of memory and time. so, to overcome this problem Android OS as system named “Zygote”. 
  • Zygote enable shared code across Dalvik VM, lower memory footprint and minimal startup time. 
  • Zygote is a VM process that starts at system boot time as we know in previous step.
  • Zygote preloads and initialize core library classes.  
  • Normally there core classes are read-only and part of Android SDK or Core frameworks. In Java VM each instance has it’s own copy of core library class files and heap objects.
  • In short, The Zygote is launched by the init process and will basically just start executing and and initialize the Dalvik VM.


6. The system server-

[Android_boot_6.png]


  • The system server is the first java component to run in the system. It will start all the Android services such as telephony manager and bluetooth.
  •  Start up of each service is currently written directly into the run method of the system server. 
  • The system server source can be found in the file frameworks/base/services/java/com/android/server/SystemServer.java in the open source project

Core Services:
1.     Starting Power Manager
2.     Creating Activity Manager
3.     Starting Telephony Registry
4.     Starting Package Manager
5.     Set Activity Manager Service as System Process
6.     Starting Context Manager
7.     Starting System Context Providers
8.     Starting Battery Service
9.     Starting Alarm Manager
10.   Starting Sensor Service
11.   Starting Window Manager
12.   Starting Bluetooth Service
13.   Starting Mount Service

Other services
1.    Starting Status Bar Service
2.     Starting Hardware Service
3.     Starting NetStat Service
4.     Starting Connectivity Service
5.     Starting Notification Manager
6.     Starting DeviceStorageMonitor Service
7.     Starting Location Manager
8.     Starting Search Service
9.     Starting Clipboard Service
10.   Starting Checkin Service
11.   Starting Wallpaper Service
12.   Starting Audio Service
13.   Starting HeadsetObserver
14.   Starting AdbSettingsObserver


7. Boot completed


Once System Services up and running in memory, Android has completed booting process, At this time “ACTION_BOOT_COMPLETED” standard broadcast action will fire. Ref: https://androidmaterial.blogspot.com/2013/03/in-depth-android-boot-sequence- process_16.html